Showing posts with label creativity. Show all posts

Saturday, September 1, 2012

Making multi-colored yarn out of single colored fiber

We spent a half day making lots of multi-colored yarns from a pile of solid colored rovings. I am showing you some pictures of the samples Maggie showed us along with some of my experimentation.

First and simplest in concept is to hold multiple rovings together and spin them. Judith Mackenzie showed us an example of this in a retreat I attended last year. I will talk some more about that later as I experiment with that technique myself. But Maggie's ideas are simpler. You can hold the rovings together and spin as is - across the colors or you can predraft them together. Predrafting blends them a bit more as the colors thin out. You can also predraft more of one color to get more of it in the mix. These two pictures are of a sample knitted like this.
Another option, to create an ikat effect, is to plan the lengths of the colors in the yarn you want. Maggie had a knitted sample like this but I am showing a woven one. The warp was spun with longer lengths of the white with the other colors having shorter lengths. The weft was spun with very short bits of the other colors so they wouldn't pool on the shorter width of the scarf. One way to get really short bursts of color is to spin them over the fold. Maggie had a mosaic knit piece that looked as if it had been knitted with a Noro-like yarn. What she had done was spin that with solid colors spun from the fold so each color was a very short length in the final yarn. This made each part of the mosaic that showed have a different color in it. Very cool.

This next set of samples was to do a gradual change of color by spinning sections of solid color with transitions planned by holding the two colors together. The advantage of this, if you want to plan it out, is that you can spin longer lengths of color for the body of a sweater and shorter lengths for the sleeves so you can get the same width of the various colors in both sections. Also, for a triangular shawl, you can increase the lengths of each color segment to accommodate the shawl's getting wider from top to bottom.

If you want to spin for socks and want even stripes, you can measure out the length of each color and spin your singles in the same color sequence. The key here is rewinding the bobbins and starting to ply from the beginning so that the colors match up better and slight variations in the length will become color transitions.

Now, similar to Judith's technique, Maggie showed us two samples. One was spun across the web, worsted, with multiple colors. You hold them together and spin across the colors to get lengths of each color in the single. You can also spin woollen long draw by spinning one for a while and then another.
The sample below is a 3 ply spun this way, with more periwinkle than the other colors.
The sample below is a 2-ply spun with 1 color more than the other. It was spun long draw with more periwinkle than the other colors. 3-ply tends to blend the colors more than 2-ply.
Blurry pictures of the entire samples below. Sorry about the quality of the photographs. Maggie was showing them to us, talking about them and then passing them around. So I was listening and observing and photographing as they came around.

 I spun some singles in various ways but then I picked a bunch of colors and drum carded them together. Below you can see a sample skein I made by woollen spinning 3 different colored rovings and plying them together. When I ran out of one, I continued with just a 2-ply. You can see a bit of it where it is just brown and gold.
The drum carding was fun. This blends the colors more and gives you little heathered bits of color as you spin.
One side of the batt.
The other side of the batt.
I then spun a single, woollen long draw, from the batt. I plied that single with my other colored singles and even some worsted that we had been spinning when we were talking about worsted-spun yarn. So there are a lot of colors in this skein. The colors move from one to another with varying lengths based on what I was trying.
This was one of the most fun parts of the class. We played a lot with colors. I have some solid colored roving from Judith's class and I plan to play some more to practice these techniques. I hope this gives you ideas and inspires you to play with some of the fiber you have. You might not like a color by itself and you can spark it up or subdue it by mixing it in various ways with other colors. You could card them together, of course, but you don't need to.

Wednesday, August 3, 2011

Exploring new media

Or, my camp contest entry...

The theme this year was Musicals. I wanted to explore something called electroluminescent wire. But, I am cheap. I didn't want to pay for shipping multiple times and none of the stores around me stock this. So I designed my project based on internet research and no actual experience with the wire. I don't recommend this

I planned to make a poster of the musical CATS with light-up yellow eyes and light-up white lettering. I carefully tried to size how much wire I would need. Failed miserably

I enjoyed the process of creating the intarsia patterns to make the poster and surprisingly, I even enjoyed knitting it. I am not a fan of intarsia but in small quantities, it is fun. I thought I would duplicate stitch the wire over the intarsia.

Then I ordered the wire and it came. It is pretty exciting stuff. Depending on the length of wire you need to light, you have a power system - an inverter and a battery or a plug. So you have to decide in advance how much wire you need so that the inverter can be sized accordingly. I ordered 4 ft of yellow and 4 ft of white.

Unfortunately, while the diameter of the wire is smaller than the diameter of the yarn I used (Cascade Eco Wool), and the wire is very flexible, it is not capable of being knitted or stitched at the same gauge as the yarn.

So I resorted to plan B.
Here is the poster, unlighted. I used the white wire to make cats' whiskers to highlight the fact that the poster is the image of a cat's face.Here it is lit up. I opted for a battery pack so that it would be portable. It is pretty cute lit up.I used the yellow wire to outline the eyes. Not wonderful but adequate.
I had to embroider the finer details around the eye to make the dancers in the poster.
This is the other eye.

While this wasn't the most successful project in showcasing the media, I am excited about playing with it. I can re-use this wire to see what sort of gauge I can get with the wire. Then I can actually knit with it. It will also help me estimate how many yards I need and get the right power source.

I came in between 5th and 10th (lost track of the counting) so it wasn't the best contest entry either. However, I won a prize that was tailor-made for me so I am very happy. I will give you the details of that and my Camp acquisitions next time.

Sunday, August 1, 2010

Tutorial: Cup holders

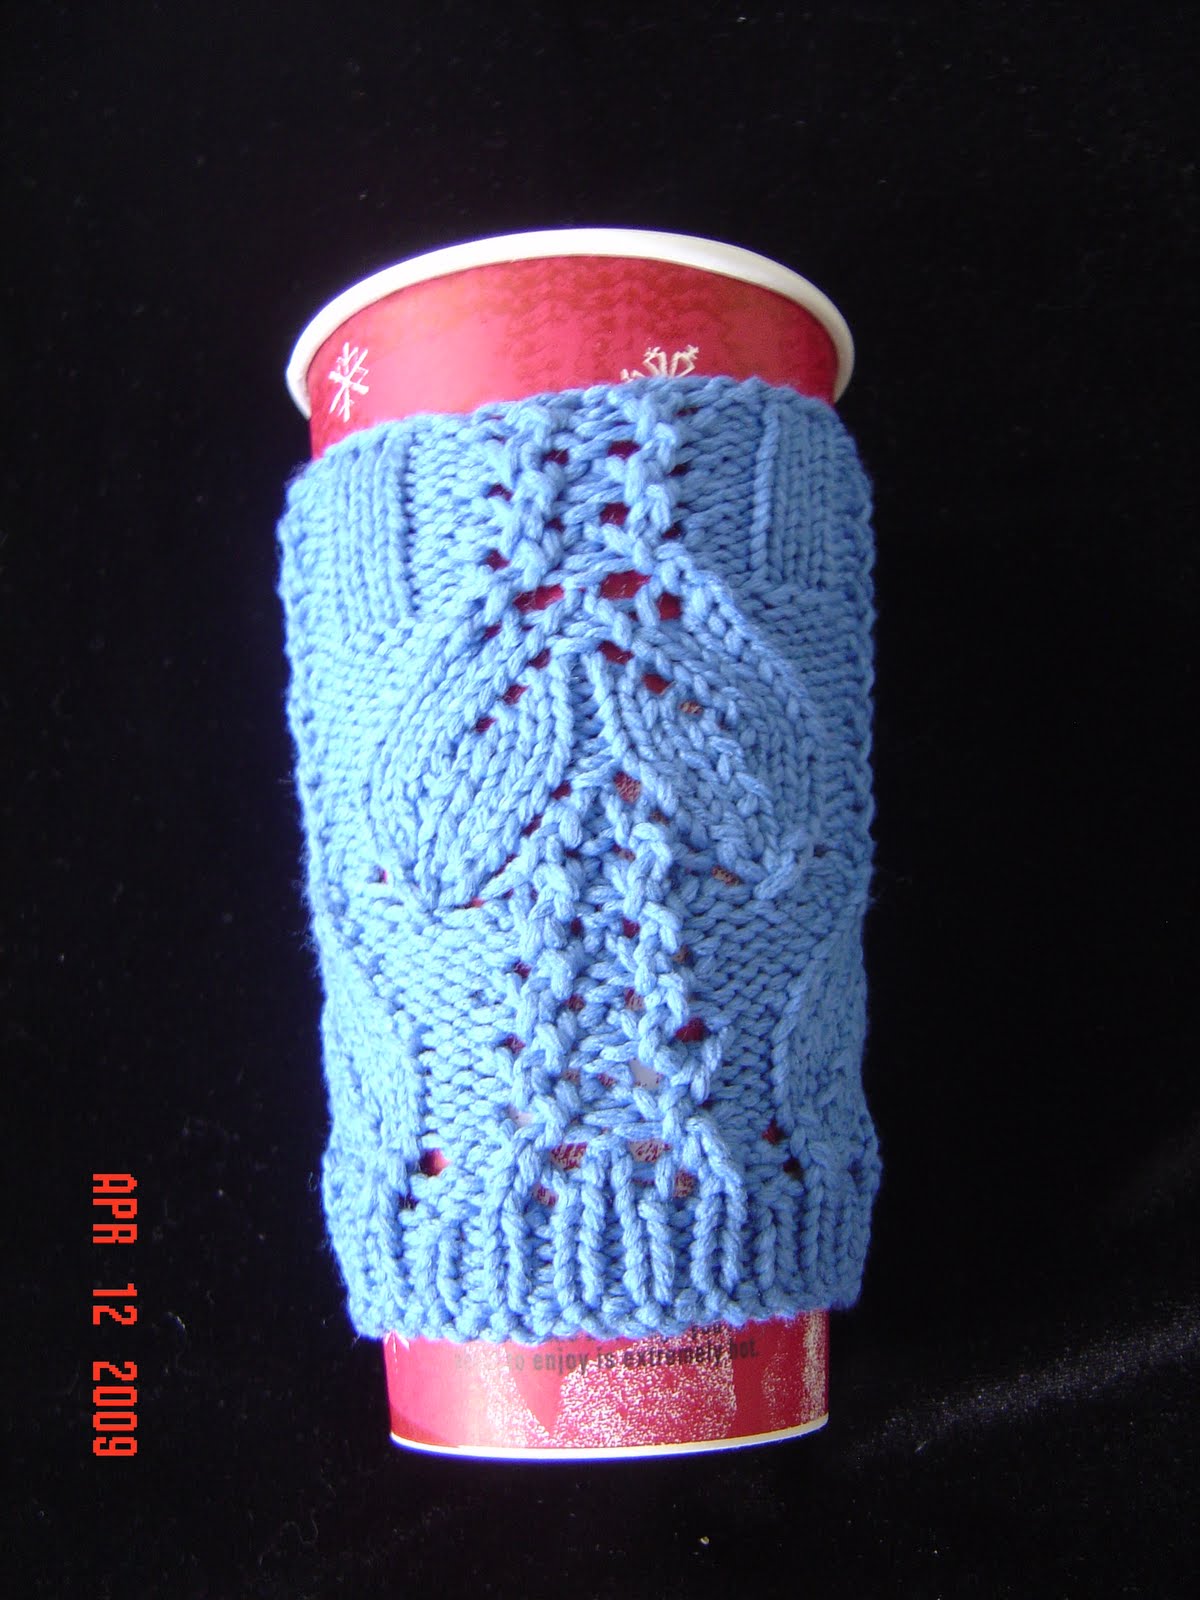
Since I haven't done much knitting this week, I thought I would give you some ideas. If you have been knitting socks as long as I have, you end up with socks that have holes in them. Even if you darn them, eventually the sock fabric is so thin that you have to either re-knit the thin part or toss it out. But there are usually other parts that are in perfect shape and it is a waste to throw the whole sock out. Today, we will reincarnate sock legs into cup holders. They make quick gifts and you can make one to fit every cup you will ever use and keep them in your purse, your backpack, your tote, your car, etc. Each pair of socks makes at least 2 cup holders.
Here is one of my dearly-beloved socks. The sole is really worn thin.
I snipped a thread right where the heel began. This is where the thin part is. My socks wear at the heel and the ball of the foot. Then I unraveled a row of sts. This is a top-down sock so unraveling is easy. If it is knit toe-up, wait for the next tutorial because the sock won't unravel properly in this direction. Here you can see where I cut and separated the good part from the worn part.
Next, measure your cup and mark that distance on your sock leg, starting at the cuff. Unravel the yarn to about 1" shorter than that mark. Wind up your yarn into a small ball so you have it to knit from. If you can't do this, or your sock leg is too short, find some yarn of a similar weight that will look good with your sock and use it.

Now knit 1" of ribbing in either your unraveled yarn or the matching yarn. Don't worry about kinks in the unraveled yarn. They will go away when you wash the cup holder. Bind off loosely in rib and ta-da! you have a cup holder. Here is the pair I made from those socks. They fit a Starbucks Grande and a Venti cup.
If you don't have worn out socks, do not despair. Just take some left over sock yarn and knit yourself a sock leg without a foot and you have a cup holder.

It is a matter of preference whether you like the cup holder to cover the entire cup (as above) or leave some space at the top and bottom (as below). The lid will cover the lip of the cup but sometimes I like to take the lid off and drink. If you are like me, you will prefer the holder to be slightly smaller than the cup. The cup holder below fits a number of different cup sizes.You can practice a new stitch pattern (as I did) or make it plain with some ribbing. Your cup holder will keep the drink warm (or cold) and prevent condensation with cold drinks.

You can also make ones that fit your water bottle to keep the condensation from dripping onto things.

Use your new eco-friendly (recycle, reuse) cup holder and water bottle cover in good health!

Tuesday, January 15, 2008

Yin and Yang

Yesterday I visited an acquaintance, who may end up being a friend. She is a knitter and quilter and we share a lot in common in some ways. Her mother was also a teacher, as was mine. We spent a lot of time discussing our creative outlets but as I was talking to her, I mentioned some of my co-workers and friends who are very talented artists and craftspeople of various kinds.

One is a fabulous embroiderer and quilter whose work spans machine embroidery and hand embroidery. She also quilts art garments and quilts and decorates quizzical cakes. Another, who is now in California after retirement, quilted amazing quilts and entered them in national shows. She is also a black belt in karate and the quilt she made her sensei when she got her black belt was inspirational. There are many knitters and quilters, but also jewelry makers. Two of my students at work learned to knit because they wanted to make knitted garments for their dolls. They make dolls, outfit them down to the shoes and jewelry, and enter them in competition. Then there are the photographers and painters.

All of these are women who began life as engineers and mathematicians and programmers. There are some history and music majors but also physicists. This year's Women's History month theme is Women's Art: Women's Vision. [For those outside the US, March has been designated as Women's History Month in the USA]. I can't think of a better way to celebrate the many facets of women than through their art and creativity.