I had the opportunity and privilege to take 4 days of classes with Judith MacKenzie last week. It was amazing. The woman really knows everything there is to know about spinning, fibers and weaving. This was a spinning workshop but we discussed using handspun in weaving.
We started off by making marled yarns. A marled yarn is one that has 2 or more colors in the yarn. A ragg yarn is an example of a marled yarn that has 2 colors. To create these marled yarns, 1 held 3 colors together, parallel to each other. Assuming ! started at the left, they would be color 1, 2 and 3 from left to right. I could start on either side but in our example, 1 started spinning on the left side of color 1 and spun across the width of the fiber. When 1 came to the right side of fiber 1, I continued across the join, spinning a bit from color 1 and from color 2 at the same time. This blends the join. Then I moved across to color 2 and spun across its width. At the join with color 3, I spun again from both and then across color 3.
At this point, there are a few options:
Once you have the singles made this way, you can 2-ply, 3-ply or do other things with them. Some of the people in the workshop made traditional 3 plies. I decided to make a cabled yarn because the colors come out as dots when you do that. I used bright colors for my first attempt. Judith recommended knitting samples with one's spinning - something I rarely do until it is time to actually make something. The purpose of the class was to learn to 'spin for a purpose' so sampling makes sense in this context.
 These were my attempts in class. The long narrow swatch in the middle was done with 2 different needle sizes - a US 3 and a US 4. That was my first attempt. The top swatch was the second and I'll discuss it further below. The skein was my third attempt. It isn't finished so is a bit squirrelly still. Judith's critique was that I am adding too much plying twist so the yarn is hard and dense.
 For my second swatch, I combed 3 colors together and dizzed them off to create 3 similar nests. They weren't all the same as a class mate added some silk to one and I didn't actually plan the colors. I had 3 and I randomly added some of each to each section of top. Then Susan of Abstract Fiber gave me a sample of her Targhee/silk/bamboo to spin. I added that to the bobbin and plied and cabled the singles. The green/yellow colors in the swatch are from her sample. The rest are Ashland Bay standard colors in their merino top.
As you can see, blending the solids creates a more even color palette without the pops of color that come from the marled yarn. Now, I chose to use a bright pink which dominates my marled yarn but that was because I wanted to see what it would look like. I used less of it in the skein and combined it with some more muted colors. In the swatch, there are 2 brights and they clash - a yellow and the pink.
I picked out the two solid colors because one can use them as contrast solid stripes in a piece. Cabled yarns are very durable and make good socks yarns as the yarn is rounded and very smooth. Plus the pops of color are interesting. The marling can be adjusted to create self striping yarns for any diameter item. Longer repeats for sweaters and hats, shorter repeats for mitts and socks.
This was fun! I have some solid colors from other classes at home. I brought home bits and put them all in a bag. I plan to have fun playing with samples this winter using those.
One of the challenges with spinning this way is that you need to be able to evenly spin across a width of top without it all getting tangled up and uneven. I am pretty good at this but not perfect. I realized that when I was spinning the 2 red braids together. Therefore, I decided to pick Judith's brain and took my top to her to explain the problem and ask what I was doing wrong. My top tends to split into an upper and lower layer and I find it hard to integrate the two.
She took one look at the piece of fiber and spread it out so there was no folding. The spinning edge was U-shaped and she immediately told me what I was doing wrong. In order to spin evenly across the edge of a combed top, one spins in one place for a while and then moves to the right or left by slightly angling the remaining fiber or the drafting triangle or both. This picks up neighboring fibers and slowly moves in the opposite direction from the tilt. I was not spinning long enough in one spot. One should spin till the staple in that spot is exhausted and then move. This was especially true at the ends, because one gets to the end, spins the current staple and then has to drop down to the next level before going back. I wasn't doing this. That is why my edge was U-shaped.
I went back and tried what she said and voila! I no longer had the problem. I can't wait to try this on the red braids. I had lots of opportunity to practice this during the workshop so I'll come back to it later.
Next up, we were introduced to camel top. Judith showed us various ways to spin it and one way she recommended we didn't spin it. That last way was an attentuated long draw as is done for cotton. It takes too much air out of the yarn and creates a dense yarn that reduces the softness of the camel.
For a change, I went back and created a sample card with all the different ways of spinning it. Actually, it is two cards. The left side is 3-plies and the right side is 2-plies. These are all plied back on themselves so sometimes there isn't enough plying twist. Woolen yarns have less spinning twist and more plying twist to make them stable. That is what traps air in them. So some of the ply-back samples don't have enough twist. Judith adds twist by rolling them on her thigh but I haven't mastered this technique. I tried it but after discussing it with her, I don't think I was pressing hard enough when I rolled.
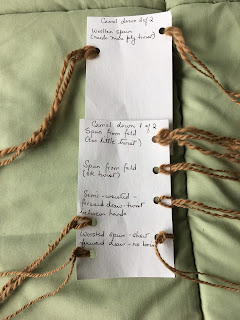
I also made a little skein of the semi-worsted draw which I plied in the normal way. I ended up putting it in the indigo dye-pot so I'll show it to you when I discuss that.
I bought some fiber from The Homestead Hobbyist.
 I spun some of this in class and it also ended up in the dye-pot. So you'll see it later. I flew to this workshop and I love traveling light. So I didn't take any fiber with me and that is why I had to start spinning this right away!
 I haven't told you this yet, but I have some cotton spinning in my future. Details at a later date. I bought some of this to try.
 I don't know what I'll do with this but I think I will spin it and then dye it. Let's see.
I also got some camel from Judith. I think I will end up spinning this from the fold. I love spinning camel top worsted but it isn't the best way to spin such a lovely airy fiber. The semi-worsted way I spun the small skein wasn't as even as I would like. That involved letting twist between the hands but drafting forward short distances. I have some more downs at home and I am more confident about spinning them now.

I'll stop here for now and continue with the rest of the class in the next post. It might be this week.
I decided my sweater was not a good travel project so I took one of my handspun skeins and a simple pattern with me on the trip. I managed to finish it between the two travel days and some knitting in class while listening to Judith. I needed to take a break from spinning to rest my hands.
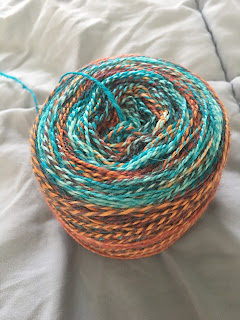 That was the wound ball before I left.
 This is what it is now. I love it. It is too hot to wear though. It is on the window sill where I can admire it. I call it my Superb Starling shawl because it reminds me of a Superb Starling.
We started off by making marled yarns. A marled yarn is one that has 2 or more colors in the yarn. A ragg yarn is an example of a marled yarn that has 2 colors. To create these marled yarns, 1 held 3 colors together, parallel to each other. Assuming ! started at the left, they would be color 1, 2 and 3 from left to right. I could start on either side but in our example, 1 started spinning on the left side of color 1 and spun across the width of the fiber. When 1 came to the right side of fiber 1, I continued across the join, spinning a bit from color 1 and from color 2 at the same time. This blends the join. Then I moved across to color 2 and spun across its width. At the join with color 3, I spun again from both and then across color 3.
At this point, there are a few options:
- Spin back across all 3 colors and keep going back and forth
- Add a 4th color and drop color 1. Judith recommends being consistent in where one adds and removes colors.
- Spin back across some of the colors but not all of color 1, 2. 3
Once you have the singles made this way, you can 2-ply, 3-ply or do other things with them. Some of the people in the workshop made traditional 3 plies. I decided to make a cabled yarn because the colors come out as dots when you do that. I used bright colors for my first attempt. Judith recommended knitting samples with one's spinning - something I rarely do until it is time to actually make something. The purpose of the class was to learn to 'spin for a purpose' so sampling makes sense in this context.


As you can see, blending the solids creates a more even color palette without the pops of color that come from the marled yarn. Now, I chose to use a bright pink which dominates my marled yarn but that was because I wanted to see what it would look like. I used less of it in the skein and combined it with some more muted colors. In the swatch, there are 2 brights and they clash - a yellow and the pink.
I picked out the two solid colors because one can use them as contrast solid stripes in a piece. Cabled yarns are very durable and make good socks yarns as the yarn is rounded and very smooth. Plus the pops of color are interesting. The marling can be adjusted to create self striping yarns for any diameter item. Longer repeats for sweaters and hats, shorter repeats for mitts and socks.
This was fun! I have some solid colors from other classes at home. I brought home bits and put them all in a bag. I plan to have fun playing with samples this winter using those.
One of the challenges with spinning this way is that you need to be able to evenly spin across a width of top without it all getting tangled up and uneven. I am pretty good at this but not perfect. I realized that when I was spinning the 2 red braids together. Therefore, I decided to pick Judith's brain and took my top to her to explain the problem and ask what I was doing wrong. My top tends to split into an upper and lower layer and I find it hard to integrate the two.
She took one look at the piece of fiber and spread it out so there was no folding. The spinning edge was U-shaped and she immediately told me what I was doing wrong. In order to spin evenly across the edge of a combed top, one spins in one place for a while and then moves to the right or left by slightly angling the remaining fiber or the drafting triangle or both. This picks up neighboring fibers and slowly moves in the opposite direction from the tilt. I was not spinning long enough in one spot. One should spin till the staple in that spot is exhausted and then move. This was especially true at the ends, because one gets to the end, spins the current staple and then has to drop down to the next level before going back. I wasn't doing this. That is why my edge was U-shaped.
I went back and tried what she said and voila! I no longer had the problem. I can't wait to try this on the red braids. I had lots of opportunity to practice this during the workshop so I'll come back to it later.
Next up, we were introduced to camel top. Judith showed us various ways to spin it and one way she recommended we didn't spin it. That last way was an attentuated long draw as is done for cotton. It takes too much air out of the yarn and creates a dense yarn that reduces the softness of the camel.
For a change, I went back and created a sample card with all the different ways of spinning it. Actually, it is two cards. The left side is 3-plies and the right side is 2-plies. These are all plied back on themselves so sometimes there isn't enough plying twist. Woolen yarns have less spinning twist and more plying twist to make them stable. That is what traps air in them. So some of the ply-back samples don't have enough twist. Judith adds twist by rolling them on her thigh but I haven't mastered this technique. I tried it but after discussing it with her, I don't think I was pressing hard enough when I rolled.

I also made a little skein of the semi-worsted draw which I plied in the normal way. I ended up putting it in the indigo dye-pot so I'll show it to you when I discuss that.
I bought some fiber from The Homestead Hobbyist.


I also got some camel from Judith. I think I will end up spinning this from the fold. I love spinning camel top worsted but it isn't the best way to spin such a lovely airy fiber. The semi-worsted way I spun the small skein wasn't as even as I would like. That involved letting twist between the hands but drafting forward short distances. I have some more downs at home and I am more confident about spinning them now.

I'll stop here for now and continue with the rest of the class in the next post. It might be this week.
I decided my sweater was not a good travel project so I took one of my handspun skeins and a simple pattern with me on the trip. I managed to finish it between the two travel days and some knitting in class while listening to Judith. I needed to take a break from spinning to rest my hands.


1 comment:
Your shawl turned out well! Such great colors, and a nice pattern for that yarn.
Post a Comment