After the camel top, we moved on to silk. I was especially interested in this as I have some silk at home and I have been afraid to spin it. We covered silk caps/hankies, silk bricks and silk top. I wasn't quick enough to score some of the lovely Red Eri silk top Judith had for sale so I had to be content with admiring other people's spinning.


 I decided to tie-dye the silk scarf but I didn't have anything except thread to tie it. No clamps or blocks like I had at Rhinebeck. I just folded it in half lengthwise, pleated it and tied it in 3 places around the pleats. I really like the result. It has a damask design on it so the white parts are not completely plain.
 These are the two napkins. All the items were dipped concurrently and sequentially in the same 3 pots so there were a number of items in each dye pot. That accounts for the lines and uneven dyeing. These were a pale pink damask before I started on them. I like the result. They look used.
 I also dipped my camel skein and the skein I spun to sample the custom Manx Loaghtan blend I got at the class. The camel is on the right and the other one is one the right. I like the effect of indigo on camel.

Judith believes that silk top must be spun worsted. Sara Lamb, in her Spinning Silk video from Interweave spins over the fold. Sara's point is that she spins a lot of silk and if she spun it short forward draw, her hands wouldn't survive the process. Judith gave us some statistics about fibers and how many times they can be bent/straightened or folded before they give way. I don't remember all the numbers but wool can tolerate this many tens of thousands of times. These are just to give you orders of magnitude, not exact numbers. Cotton and Tencel fall in the middle with tolerances in the few thousands. Silk has the lowest tolerance. The implication here is that the yarn will not be as durable because as you knit or crochet, and as you use the item, the folded silk fibers (from spinning over the fold) will flex and straighten and eventually give way. It was an interesting perspective and as most of us are not spinning for heirloom items, it may not be a big deal.
Silk also will stick to almost any surface. Human skin and other silk are two exceptions. She recommended that we wrap the fiber in a silk scarf and hold it within the scarf and spin from the end peeking out. During the class, one of the members held a silk hankie in his fiber hand and spun silk. I didn't have any silk with me so I held it loosely in my hand and spun it quite successfully. The tip from the worsted spinning the day before helped me a lot.

The thread on the bobbin core is what I spun. The rest is the silk she gave us to spin. I spun a very fine Corriedale when I first got a support spindle and I thought it might be nice to ply a fine silk yarn to ply with it. That bleached tussah in the bottom is for that purpose. I don't have much yardage in the Corriedale but there should be enough for a cowl. The rest is honey tussah. I showed Judith my singles and she thought I could add some more twist to it. I was pleased that I didn't have a lot of lumps and bumps and also didn't have to pull off any messed up fiber. The messed up silk is good for carding and blending.
We also discussed spinning embroidery thread. The key here is that it should be 2-ply, it should have a lot of twist and it needs to be fine. The 2-ply is so that there is a 'bite ' to the yarn so it stays put on the fabric. A 3-ply is a round yarn and is more likely to slip and slide on the fabric. Once the yarn is plied, it should have an even twist so that it doesn't snag. Judith paid for her first wheel by spinning embroidery floss and selling it in 10-yd lengths. I think I have some spindle-spun yarn that might qualify for embroidery thread in diameter if not in quality.
We also discussed silk caps. These are like silk hankies except that hankies are cocoons spread out on a square frame and a cap is stretched out over a cap-shaped form. Judith tried to demonstrate how she stretches out the cap on her swift. She puts it on the top, secures the ends around the spokes - you just have to stretch them to fit evenly on the spokes, they will stay put, and then she opens the swift to stretch the cap. However, the swift we had in class did not cooperate because it opened in a different way. So she ended up stretching it with her hands. She then broke off an end and started drafting. The important part to remember here is that you can't draft once you get some twist into the silk fibers because we are looking at a set of single long fibers. So draft the silk out to an approximation of the thickness you want.
Judith just wound the drafted silk around her hand and also put it in a pile in the floor. One of the class students showed us what happens when you wrap the silk tightly on a card for future spinning. It melts into itself and you have to start over with the drafting. The moral of the story is spin it soon after drafting and maybe put the drafted fiber in a pile in a paper bag or bowl.
A silk brick is a very tightly compressed piece of silk fiber. You have to find the end and open it up. It is wound up and compressed while it is still wet. So the top layer of fiber won't draft properly and needs to be discarded. It is wrinkly and doesn't look much like silk. Judith's experience is that it won't straighten out even if you wet and stretch it. She recommended that it be used for blending or carding where you want some texture. After that removing that section, the rest of the brick is spun just like top.
We moved on to dyeing. Judith had asked us to bring items to dye in an indigo bath and many students had brought shirts, pants, yarn, etc. It was a revelation to me that I could dye these types of items in an indigo bath. Indigo will dye almost anything. One student knit a sweater in an orange-y yarn and it looked gorgeous after dyeing. She also dyed a neon poly-cotton T-shirt which turned a nice bright shade of green.
The bath was created with the same pre-reduced indigo that I had used at Rhinebeck. But this time, one of the epiphanies from the class is that I don't have to keep an indigo pot going for a long time. Judith showed us how we can make a dye-pot, dye items till the dye is exhausted and then be done with it. The class included a silk scarf for dyeing but Judith had also brought things she had found in thrift shops. One of her finds was a large number of 100% linen T-shirts that were labeled 4XL but weren't anywhere close to that size. They were more like a women's large. She had dyed some of them with tea and some with tea and cochineal. We were welcome to as many as we wanted once everyone had a chance to get one at a cost of $5 which was Judith's cost. I took 2 - a tea dyed one and a white one. I also dyed 2 hand-stitched napkins. I am now going to be haunting my local Goodwill store.
I was a bit taken aback by the additional items to dye so I didn't plan my dyeing very well. I should have tied the tea dyed T-shirt before putting in the dye-bath. As it turned out, both T-shirts ended up with a very similar color. I dipped each shirt twice, one day apart. The first T-shirt is pretty evenly dyed with a bit of a kettle-dyed look. I decided to tie the second T-shirt after its first bath as it was really splotchy and I didn't like the splotches. I rolled it diagonally and tied it. You can see the faint diagonal lines on the front and the more pronounced ones in the back.


To make the dye pot, we filled the pot with water just warm to the hand. Indigo needs to be between 90 and 140F. It will not dye once it goes above 140 but you don't have to go that high. The temperature felt as if it was slightly warmer than I would use for adding a yogurt starter to milk. Then Judith mixed the dye crystals with warm water in a mason jar and stirred to dissolve. It should be a lovely green color below the surface. Judith uses small amounts of Rit dye remover instead of Thiox to remove the oxygen in the water. She just sprinkles a little bit into the jar. Once the crystals are dissolved, she slowly adds the dye to the warm water. She didn't measure anything. She said that a pot like this doesn't require as much care as a pot that one will keep for a long time - adding Thiox every week and making sure the ph is correct. The Rit dye remover is toxic but the quantities are so small that she felt it was OK for a pot that will be exhausted in the day.
Indigo will only deposit in an absence of oxygen. So stirring, adding and removing items from the pot needs to be done with care. Items need to be lowered gently into the pot and must be removed from the side so they don't drip into the pot. Bubbles of air introduce oxygen which causes the indigo to morph out of the form in which it will deposit.
Once the dye is added to the pot, Judith adds another sprinkle of the dye remover and then we let the pot sit for about 10-15 mins. Then she puts in a drop of Dawn dish detergent into the pot. This causes the indigo particles that have formed a scum on the surface to move out of the way and the items can be submerged without worrying about getting these particles on the item. The scum is the indigo that has been exposed to the air on top of the dye-pot. In a long-running bath, this *flower* seals the surface and prevents oxygen from getting into the dye solution. It is removed and saved, and then replaced when one is done dyeing for the day. But in a temporary, one-time pot, it doesn't build up enough to become a flower.
Judith added as many items as would fit. A few big items that needed a lot of dye and then some of the smaller items to fill out the pot. Items are left in there for about 20-30 mins with some stirring periodically during that interval. Then the items are removed and are not squeezed as they come out. You want the dye to remain on the fabric. We took the wet items and waved them around, aerating all the surfaces to cause the indigo reaction. If you haven't seen indigo dyeing, the items come out of the dye pot a green color. This is the un-oxygenated version of indigo. When it is exposed to air, it turns blue and deposits on the surface. This is why you don't squeeze the dye out of the item.
After aerating them for a while, we spread them out on tarps or on the grass and flipped them around every 10 mins or so to continue the aerating process. The indigo will continue to deposit and harden over a period of time. According to one of the experts Judith quoted, the longer you leave the indigo on the item before you rinse it, the longer the color will last. I haven't rinsed any of my items yet. They need to be rinsed till the water runs clear and then ironed.
I am much more confident of making a one-day temporary pot in which I can dye a number of items and then exhausting it. The bath can be refreshed with more dye dissolved in the mason jar as the day progresses. When the dye concentration comes down, you can re-dye things or use the dye to do a light wash of color on other items. Indigo should be the last dye on the fabric as it doesn't penetrate and bond but sits on the surface of the item. You can dye with acid or natural dyes before you dye with indigo.
I found this article at Earth Guild on one-time dyeing. It also clarified a few things for me as I saw the difference between a one-time pot and a multi-use pot.
I found this article at Earth Guild on one-time dyeing. It also clarified a few things for me as I saw the difference between a one-time pot and a multi-use pot.
We dyed on two days. Some items went in twice and some went in once. The dye pots were a pale blue when we dumped them. If one uses Thiox, one has to add vinegar to neutralize the ph before the pot is emptied. In this case, we used so little Rit dye remover (maybe a tsp per dye pot?) that it didn't affect the ph too much.
One item that was relevant to me was the process of estimating the yardage of yarn needed for a project like a sweater.
- Spin s sample yarn and knit a swatch. Repeat this process till you have a swatch you like. Remember that changing needle sizes will change the fabric so experiment with 2-3 needle sizes for each yarn. It should be a decent sized swatch. Once you have a swatch you like, proceed with step 2.
- Use a yarn balance to get the yards/lb (YPP) of your yarn
- Weigh your swatch
- Calculate the area of your swatch.
- Divide your project into a series of shapes and estimate the area of each shape. This is easier if you have a schematic. For example, a sleeve is a rectangle with two triangles on either side of it.
- Divide the area of your project by the area of your swatch to calculate how many swatches there are in your project (this is needed to get the approximate weight of the whole project). If you have 20 swatches in your project, the weight of the project will be 20x the weight of the swatch.
- Use the YPP number to calculate the yardage needed for that weight which will give you the yardage you need. Obviously, this is an estimate, so add at least 20% contingency to this number.
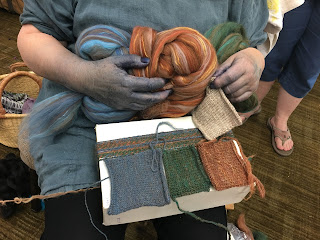
Some of the students in the class spun and knit swatches using the dyed and undyed versions of the Merino/Shetland/Manx Loaghtan/silk from The Homestead Hobbyist. She showed us how these all go together because they are dyed on the same base. You can see the fiber and the swatches here.

We also learned to card and comb using Judith's Dutch combs and electric drum carder. I didn't make any batts but others did.
Judith also brought us items of clothing that she found in thrift shops and the first person it fit got the item. These were beautifully made dresses and shirts in natural fabrics. I got a dark blue linen short sleeved shirt that I used as a smock when we dyed!
All in all, it was a very inspirational, educational, relaxing, and enjoyable workshop.


