Saturday, December 31, 2011

Another year flew by!

Happy New Year to you, my dear readers! As I write this, 2011 is almost over and I am looking forward to 2012. I hope the new year brings you joy, prosperity and good health. I hope that there is more peace in the world and less suffering. 2011 was a tough year for many folks but there were also some streaks of light in the east. People stood up for freedom and against tyranny. I hope their sacrifices don't go unrewarded.

My goals in 2012 are to work from stash and not to buy more yarn. I have lots of yarn and I am making more.

I started spinning again. I had been on a hiatus since Oct for one reason or another. I plied the singles I had spun back in Oct but I haven't finished the yarn yet. Then I started spinning this Targhee top that I bought on clearance from Woodland Woolworks last spring. I needed the bright colors as it is dreary and gray outside. It also gets dark early so the colors are my way of brightening up the dark days of winter.

I also started another shawl. This is in a linen/silk blend from Colourmart. I had bought 3 cones in different colors a while ago. I am making the Dancing Cranes pattern from Elann.com. It is a simple lace pattern from one of the Barbara Walker treasuries called Japanese Feather. I designed and made a pair of socks with it years ago.

This stole is for a niece who is in India. I think the linen/silk will soften with time and also be cool for the hotter climate. The swatch (pictured above) has a nice crisp hand but is not as soft as I would like. I think I'll machine wash the stole to see if it softens up further before I deliver it.

Wednesday, December 28, 2011

After blocking pics


I thought I'd add the after pictures also.

Tuesday, December 27, 2011

The Good, the Bad and the Beautiful

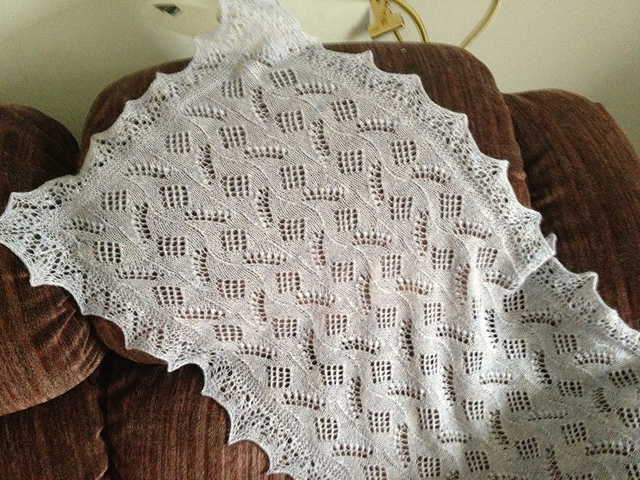
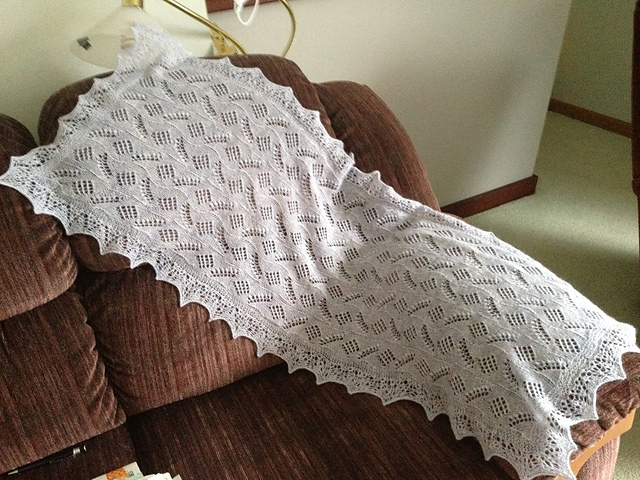
I don't know why I do these things. Sometimes I just get on a roll and want to finish a particular project. This one was one of them. I have been knitting the edging for days. The good news first: the stole is done and is blocking. The bad news: my hands hurt. The body of the stole was not a problem. It didn't hurt my hands. The edging did. You pick up sts all around the perimeter of the stole and knit the edging. I think the problem was the k3tog and sssk's that were part of the edging. Or maybe the 800 or so sts...

Anyway it is done. I am going to rest my hands for a few days by doing non-knitting things.

And last but not least, the beautiful: isn't it a lovely pattern? I am very pleased with the outcome.

Sunday, December 11, 2011

More on nupps

Colleen, thank you for the helpful suggestions on nupps. I tried doing the double wraps on some and all of the yarn overs. However, for me, the nupps turned out very sloppy. But your suggestion to tug on the nupp did the trick. For me, tugging on it after slipping the 6 loops over the first p1 made lovely even nupps.

All that experimenting resulted in nupps that looked very different from each other and the result was messy. So I ripped it out and started over.
Now I am happy with the resulting pattern. It is looking like lace. Yay! On with the remaining 10 repeats to finish the stole.

Monday, December 5, 2011

Nupps and beads

I started knitting an Estonian lace shawl. It has nupps which are like little buttons of yarn. You make a lot of new sts in one st on one row and knit or purl them all together in the next row. People find this to be a pain and often substitute beads for the nupps. Beads are also decorative, so why not?

That was also my plan when I started this shawl. I was going to put little fresh water pearls on the shawl. Well plan A failed because the holes in the beads were too small for two of the yarn thickness to go through. I can. Use them but I have to string them all on in the beginning, which I had not done. On to plan B, which was to try out a very simple method using a crochet hook. That worked but I didn't like the result. It made messy little nupps that looked more like bobbles. Bobbles stick out more and they wobble, whereas nupps don't. 

I resorted to making the nupps the traditional way. I simplified the p7tog part of it by purling 1, putting it back on the left needle and passing the other 6 loops over it before returning it to the right needle. 
Here's the shawl, or a tiny bit of it. There is a lot of knitting left in this one!

My daughter had an indigenous bead wrap on her wrist. I liked it so much, I got one just like it! Aren't they pretty? I have to see how long it will last. 
Back to knitting and nupping!

Wednesday, November 30, 2011

Picking up and knitting a hem or a facing

This is a step-by-step tutorial on how to pick up and knit a facing or a hem. A facing is a shaped piece of fabric that is used to cover up raw edges. It is used most often in sewing on the insides of button bands, collars, and neck trim. In this case, I am going to knit a hem that is also a facing. But the process applies to both.

In knitting, facings are most often used to enclose steeks but that is not their only purpose. I am using it here to enclose a steek.

Step 1 is to pick up the sts along the edge that is going to be enclosed. The key here is to pick up sts along a straight column of sts so that it looks neat and finished. This is a view of the picked up sts from from the wrong. You can see that the picked up sts follow a straight line. It is very easy to move a half st over. If you notice this, it takes very effort to start over.
It is easier to see along the yoke where there is less curling. When I picked up these sts, I noticed I was a half-st off when I got to the yoke because I started at the hem. That would have removed a half st from the yoke, which would have been noticeable. So I started over.When you pick up sts, the steek (in this case) automatically turns under. The steeked edge tends curl inwards due to the stockinette. If another st was used, it may not turn under until you pick up the sts. See how nice and flat the steek is? This is why I didn't want to use the crochet steek. If I was knitting, for example, a button band and wanted to knit a facing at the same time, I would pick up a st and create a st by doing a yarnover. So the pattern would be *pick up and knit 1, yo, rep from * to end. Then I would separate the yarnovers by putting them on a different needle. The picked up sts would become the button band and the sts created by yarnovers would be used to knit the facing in the other direction as we will be doing here.

Step 2 is to knit the facing. This is usually in stockinette. Sometimes a thinner yarn is used to knit the facing using the same size needle as the body. This makes for a thinner fabric which cuts down on bulk. Facings can also be used to provide a pop of color when the finished edge turns inside out. This is used a lot on sleeve cuffs. When you fold the cuff up, the facing gives you a different color on the end of the sleeve.
Here is a view of the knitting from the wrong side. In this case, I am knitting a picot hem. So I created the picots along the turning edge by a row of k2tog, yo. After that I continued knitting the hem/facing. In this view, I am part-way along the hem. You can see the row of yarnovers that will make the picots.You can see how flat the steeked edge is and how nicely it folds to the inside. I am doing this all along the front edge.Once you have knit the facing with enough depth to cover the steek, most of the work is done. Step 4 is to verify that your facing will cover the steeked edge. You can fold it along the turning edge (the row of yarnovers here) to verify that it is deep enough. I didn't take a picture of that as I ran out of hands.

Step 5 is to bind off the facing/hem.

Step 6 is to sew it down. I like to sew about every 2-3 sts, skimming through the wrong side of the fabric and then up through one of the bound off sts. If you go all the way through the fabric, it may be visible on the right side. But if you go through the purl bump part-way, it will be invisible. Make sure that you aren't pulling the sts too tight as you sew. Turn it to the right side frequently and check to make sure that the sewing is both invisible and doesn't interfere with the elasticity of the knitted fabric.

You can just run the end of the yarn into the hem/facing and you are done! I like to do a double st as the beginning and and end rather than using knots.

I hope this helps you visualize the process.

Sunday, November 27, 2011

Steeking a Bohus

I finally picked up and worked on the Rose Lace Collar Bohus and it will probably be finished today. I first finished the second sleeve (I had about 10 rounds remaining!) and hemmed both sleeves. Here is an unblocked view. I did a little colorwork on the sleeve cuff.
Then I hemmed the bottom edge.Now I had to cut the center front open. I started doing a crochet steek, but I didn't like it. It was bulky and I was struggling to manage the tiny hook (1.65 mm) and see the rows and sts where I had to pick up the loops. So I abandoned it in favor of a backstitched steek. I did 2 rows of back stitching on the sts that would have been united by the crochet.

If you number my steek sts as 1, 2, 3, 4, 5, 6, 7, 8, 9, 10 from left to right when facing the front, I wanted to cut the steek between sts 5 and 6. The crochet steek would have gone through the right leg of st 4 and the left leg of st 5 on the left of the steek, and the right leg of st 6 and the left leg of st 7 on the right of the steek. I backstitched down the right leg of st 4 and up the left leg of st 5 and repeated down the right leg of st 6 and the left leg of st 7. I hope this makes sense. If it doesn't, I can add a diagram.

Here is the stitched and cut steek on the right front of the garment.

It is easier to see on the reverse side as I used a matching color sewing thread. It would have been faster to machine st it but I would have to take out the machine, thread a bobbin, etc. So I decided to sew by hand. As the daylight hours waned, I had to rely on my daylight lamp + magnifier (something similar to this) to see the sts.Here is the reverse where you can see the two rows of pink stitching between my fingers. The steek edge curls to the inside just like with any other steek, that is why I had to hold it open. I picked up sts and knit a picot hem down the front edge and made it long enough to cover the cut edge. I prefer to bind off my sts and then do the hem, rather than securing live sts as one requires fewer sts to hold the hem down and it is less visible from the right side. It also makes a nice edge on the inside. Lastly, here is the view from the right side. You can see the finished edge on the left front and the raw, cut edge on the right front. No unraveling here. The Bohus yarn is very sticky and the stitching does a good job of securing it so it doesn't go anywhere. I suspect that it would have been stable even if I hadn't stabilized the edge. That is an experiment for a future Bohus.

Today I hope to finish the other front and block the jacket. I tried it on yesterday (yes, with cut and unfinished edges) and it looks exactly as I had envisioned it. I don't plan on putting buttons on. It will just be an open cardigan that I can add a pin to, if I wish to hold the fronts together.